
App Volumes Capture Error 2755
Had another weird App Volumes 2.15 error recently. I have a few Windows 10 LTSC 2019 capture machines (1809) and was getting error 2755 unable to detect the file whenever the installer would try to start a .msi file.
I tried rebuilding, I tried disabling UAC, Windows Firewall, anything I could think of. After a bit of internet searching I found several articles saying to remove KB4487017 (February updates). Unfortunately, there was no relevant KB to delete.
After a few more frustrating attempts, I came across a post recommending the following registry change:
on the key HKEY_LOCAL_MACHINE\SYSTEM\CurrentControlSet\services\svdriver\Parameters add the following to the HookInjectionWhitelist
*msiexec.exe ||*
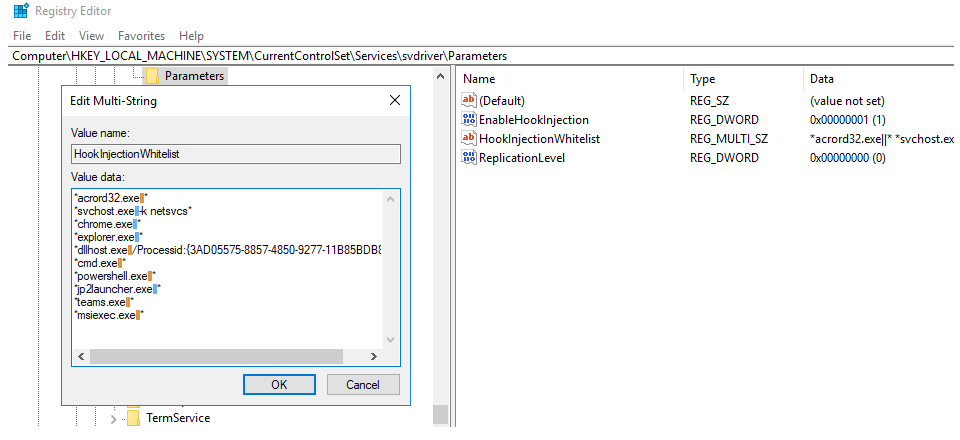
This solved it for my environment, hopefully it will help you as well!
App Volumes Database Password issue
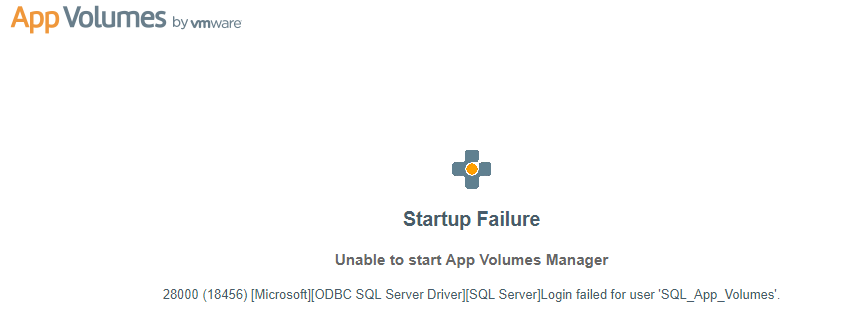
Recently I encountered a strange issue with App Volumes and the ODBC connection. Whenever I would install App Volumes Manager, it would accept my DB entry and credentials. However, when we try to access App Volumes Manager, it would give an error stating Login Failed. The SQL logs also stated “password mismatch”.
I tried to re-enter the known good password but the issue would persist. I searched high and low for an answer and finally called in the help of a colleague. After spending some time with me, he remembered a similar issue he had during a recent installation.
The issue was the password had a symbol in it. In my case, a percent sign (%). While this is a perfectly fine character for a SQL Server password, App Volumes has a problem with it. This is due to the use of Ruby on Rails in App Volumes. Ruby uses the % character for string interpolation. Once I used a password with out the %, everything worked as expected.
I suspect any special character that Ruby uses for string manipulation would have a similar issue. This was a frustrating issue and seems to be undocumented by VMware. It would be nice if the installer would test for characters not allowed, but for now, be aware of the issue.
VM Deployment with PowerCLI Part Two
In my last post I presented you with the main deployment script I have been using. What it did not include are all the little tweaks and prerequisites that allow it to work.
The first thing we need before running the script is a Template. As previously mentioned, I built a vm from the corporate standard ISO. I then applied updates and added some post deployment scripts to do things we couldn’t do with NEW-VM or the customization specification.
Here are the files I used. Some consolidation could be made and your mileage may vary:
|
1 2 3 4 5 6 7 8 9 10 |
powershell -command "& {Set-ExecutionPolicy Unrestricted}" powershell -file "c:\temp\pre-domain-config.ps1" cd \ cd temp\client c:\temp\client\ccmsetup.exe /noservice smssitecode=auto ccmhttpport="80" ccmhttpsport="443" timeout /t 30 powershell -file "c:\temp\post-domain-config.ps1" powershell -command "& {Restart-Computer}" |
This simple .bat file is called by the customization specification. It is calling two other powershell scripts, installing sccm client and restarting the vm to finish up the installs.
The first file called is:
|
1 2 3 4 5 6 7 8 9 10 11 12 13 14 15 16 17 18 19 20 21 |
Write-Host "Setting SNMP Properties" -ForegroundColor Green Remove-ItemProperty -path "HKLM:\SYSTEM\CurrentControlSet\Services\SNMP\Parameters\PermittedManagers" -Name "1" Set-ItemProperty -path "HKLM:\SYSTEM\CurrentControlSet\Services\SNMP\Parameters\ValidCommunities" -name "SNMP-community-name" -value 16 -type dword Write-Host "Setting DNS Servers" -foregroundcolor Green Set-DnsClientServerAddress -interfaceindex 12 -ServerAddresses ("x.x.x.x", "x.x.x.x") Write-Host "Disabling IPV6" -ForegroundColor Green disable-netadapterbinding -interfacedescription "vmxnet3 ethernet adapter" -ComponentID ms_tcpip6 Write-Host "Adding DNS Server Suffixes" -ForegroundColor Green Set-DNSClientGlobalSetting -SuffixSearchList @("our-domain.local.local","our-domain-2.com") Write-Host "Renaming Guest Account" -ForegroundColor Green Rename-LocalUser Guest localguest |
This file sets the SNMP properties, updated DNS servers, disables IPv6, adds domain suffixes and renames the local guest account
The next file:
|
1 2 3 4 5 6 7 8 9 |
Write-Host "Adding AD-Group to Local Administrators" -foregroundcolor Green Add-LocalGroupMember -Group "Administrators" -Member "domain\our_admin_group" regedit /s C:\temp\legal.reg Write-host "Renaming Admin Account" -ForegroundColor Green Rename-LocalUser Administrator localadmin |
This file adds our AD admin group to the local administrators group on the vm. It also renames the local Administrator account. You may notice the calling of the legal.reg file. This was needed because we have a legal message displayed after login, and it was causing us to have to interact with each vm to get it through the customization process. We disabled the legal notice in the template, and reinstate it using the registry key.
Here it is, masked for business sensitive information, of course:
|
1 2 3 4 5 6 7 8 9 10 11 12 13 14 15 16 17 18 19 20 21 22 23 24 25 26 27 28 29 30 31 32 33 34 35 36 37 38 39 40 41 42 |
Windows Registry Editor Version 5.00 [HKEY_LOCAL_MACHINE\SOFTWARE\Microsoft\Windows\CurrentVersion\policies\system] "DisableAutomaticRestartSignOn"=dword:00000001 "EnableVirtualization"=dword:00000001 "EnableInstallerDetection"=dword:00000001 "DelayedDesktopSwitchTimeout"=dword:00000000 "PromptOnSecureDesktop"=dword:00000001 "EnableLUA"=dword:00000000 "EnableSecureUIAPaths"=dword:00000001 "ConsentPromptBehaviorAdmin"=dword:00000005 "ValidateAdminCodeSignatures"=dword:00000000 "EnableUIADesktopToggle"=dword:00000000 "EnableCursorSuppression"=dword:00000001 "ConsentPromptBehaviorUser"=dword:00000003 "disablecad"=dword:00000000 "dontdisplaylastusername"=dword:00000001 "legalnoticecaption"="WARNING" "legalnoticetext"="This computing system is a company owned asset and provided for the exclusive use of authorized personnel for business purposes. All information and data created, accessed, processed, or stored using this system, (including personal information) are subject to monitoring,auditing, or review to the extent permitted by applicable law. Unauthorized use or abuse of this system may lead to corrective action including termination of employment, civil and/or criminal penalties." "scforceoption"=dword:00000000 "shutdownwithoutlogon"=dword:00000000 "undockwithoutlogon"=dword:00000000 "FilterAdministratorToken"=dword:00000000 "DSCAutomationHostEnabled"=dword:00000002 [HKEY_LOCAL_MACHINE\SOFTWARE\Microsoft\Windows\CurrentVersion\policies\system\Audit] [HKEY_LOCAL_MACHINE\SOFTWARE\Microsoft\Windows\CurrentVersion\policies\system\UIPI] [HKEY_LOCAL_MACHINE\SOFTWARE\Microsoft\Windows\CurrentVersion\policies\system\UIPI\Clipboard] [HKEY_LOCAL_MACHINE\SOFTWARE\Microsoft\Windows\CurrentVersion\policies\system\UIPI\Clipboard\ExceptionFormats] "CF_UNICODETEXT"=dword:0000000d "CF_DIBV5"=dword:00000011 "CF_PALETTE"=dword:00000009 "CF_BITMAP"=dword:00000002 "CF_TEXT"=dword:00000001 "CF_DIB"=dword:00000008 "CF_OEMTEXT"=dword:00000007 |
Now that we have talked about all the scripts and their functions, lets move on to the last, yet very important piece: The customization specification.
I created one specifically for this build process as I needed to customize it a bit more than we were doing normally. I needed credentials with domain joining ability, the proper domain specified in the CS and adding pre.bat to the run once field.
As you can see, not terribly complicated. Definitely room for improvement. And, with the addition of some actual automation tools, could become much more powerful. This was simply my way to reduce busy work within the confines of our environment. Please feel free to use this, pick it apart or send me beer if you really liked it :)
VM Deployment With PowerCLI part one
Tedious, repetitive processes are the number one factor in deciding whether to write a new script. In my current position, we are asked to deploy new VMs on a pretty regular basis and in some cases it may be upwards of 20 in one batch! The standard way we accomplish this is through the following steps:
1. Create a new VM using the vSphere client, setting the general parameters
2. Attach the vendor created ISO that will do all the customization to the selected OS. (this step takes 30-60 minutes)
3. Set SNMP properties
4. Set IP and DNS settings
5. Disable IPV6
6. Add DNS search suffixes
7. Rename local Admin and Guest accounts
8. Install SCCM 2007 Client
9. Add our AD security group to the Local Administrators group
10. Install Cisco AMP
As you can see, there are a lot of steps in the original build process. For one off VMs, this might be acceptable. However, when you need 24 VMs for a big project, it could easily take several work days of your time. This is when my distaste for repetitive, manual processes comes into play.
The first thing that comes to mind, is how much of this can be streamlined through PowerCLI. As it turns out, most of it! Now, having no official automation tools or even support from within to accomplish this task, I had to improvise. This means there are a few factors other than PowerCLI in play. I have a .CSV file containing all the fields necessary to complete the build. Batch files and small Powershell scripts to do some customization. Custom VM Templates and Customization Specifications. As you can see, quite a few tools being used to achieve our modest goals.
The .csv file contains the following fields:
Name – Name of the VM
Template – Name of the Template we are using
Cluster – Which Cluster are we putting this VM in
Datastore – What Datastore should we use
Customization – This is the Customization Specification
vCPU – Number of vCPUs
Memory – Amount of memory
Network – Network the VM should be on
Diskformat – Thick or Thin
Location – Which folder the VM should be in
ipaddress – The IP address
mask – Subnet mask
gateway – Default Gateway
dns1 – DNS server
dns2 – DNS server
disk1 – Disk one size
disk2 – Disk two size (if no disk two, 0 or leave blank)
The .CSV file has the above names as the first set of values. So the next step in the new process is: create/edit the .CSV, in my case, it is named NEWVMS.CVS
Now we are ready to start the actual script.
First we need to get the data from the .CSV
|
1 |
$vms = Import-CSV "c:\Scripts\deploy\NewVMs.csv" |
Something I decided to add was a time/date stamp and who built the VM, so we need to get the username of the person running the script (another thing you may consider adding is a project name or sponsor.
|
1 |
$name = get-aduser -identity $env:username -Properties name | Select-Object -ExpandProperty name |
Now we get to the fun stuff, importing the data and assigning it to variables
|
1 2 3 4 5 6 7 8 9 10 11 12 13 14 15 16 17 18 19 20 21 22 |
foreach ($vm in $vms) { #Assign Variables $VMName = $vm.Name $Template = Get-Template -name $vm.Template $Cluster = $vm.Cluster $Datastore = Get-Datastore -Name $vm.Datastore $Custom = Get-OSCustomizationSpec -Name $vm.Customization $vCPU = $vm.vCPU $Memory = $vm.Memory $Network = $vm.Network $Diskformat = $vm.Diskformat $Location = $vm.Location $ipaddress = $vm.ipaddress $mask = $vm.mask $gateway = $vm.gateway $dns1 = $vm.dns1 $dns2 = $vm.dns2 $disk1 = $vm.disk1 $disk2 = $vm.disk2 |
One more step before we build the VM, Set the IP, subnet mask, default gateway and DNS servers in the Customization Specification. If we don’t, we cannot have the VM join the domain using the guest customization routines.
|
1 2 |
# setup nic maping in the custimzation specification Get-OSCustomizationSpec $Custom | Get-OSCustomizationNicMapping | Set-OSCustomizationNicMapping -IpMode UseStaticIp -IpAddress $ipaddress -SubnetMask $mask -DefaultGateway $gateway -Dns $dns1,$dns2 |
Now we can finally call the New-VM cmdlet and build the VM
|
1 2 3 |
#Build the VM New-VM -Name $VMName -Template $Template -ResourcePool (Get-Cluster $Cluster | Get-ResourcePool) -location $location -StorageFormat $Diskformat -Datastore $Datastore -OSCustomizationSpec $Custom Start-Sleep -Seconds 10 |
Now we will set the VM name, Amount of Memory, Number of CPUs and the Network the Primary NIC will be on
|
1 2 3 4 |
#Set the vCPU, memory, and network $NewVM = Get-VM -Name $VMName $NewVM | Set-VM -MemoryGB $Memory -NumCpu $vCPU -Confirm:$false $NewVM | Get-NetworkAdapter | Set-NetworkAdapter -NetworkName $Network -Confirm:$false |
the last few steps are add the second disk (if it exists), set vm built date and builder in the notes field and start the VM!
|
1 2 3 4 5 6 7 8 9 10 11 12 13 |
#Add Disk 2 if it exists if ($disk2 -ne $null) { $NewVM | New-HardDisk -CapacityGB $disk2 -StorageFormat $Diskformat } else { } #Set vm build date $notes = "Built By: " + $name + "`r`nBuild Date: " + (get-date) set-vm -vm $newvm -description $notes -Confirm:$false #Start the VM to continue the customization process $NewVM | Start-VM } |
At this point the VM build process is complete. But wait! What about the other steps? I will cover those in detail in my next post. for now, here is the complete script:
|
1 2 3 4 5 6 7 8 9 10 11 12 13 14 15 16 17 18 19 20 21 22 23 24 25 26 27 28 29 30 31 32 33 34 35 36 37 38 39 40 41 42 43 44 45 46 47 48 49 50 51 52 53 54 55 56 57 58 59 |
$vms = Import-CSV "c:\Scripts\deploy\NewVMs.csv" $name = get-aduser -identity $env:username -Properties name | Select-Object -ExpandProperty name foreach ($vm in $vms) { #Assign Variables $VMName = $vm.Name $Template = Get-Template -name $vm.Template $Cluster = $vm.Cluster $Datastore = Get-Datastore -Name $vm.Datastore $Custom = Get-OSCustomizationSpec -Name $vm.Customization $vCPU = $vm.vCPU $Memory = $vm.Memory $Network = $vm.Network $Diskformat = $vm.Diskformat $Location = $vm.Location $ipaddress = $vm.ipaddress $mask = $vm.mask $gateway = $vm.gateway $dns1 = $vm.dns1 $dns2 = $vm.dns2 $disk1 = $vm.disk1 $disk2 = $vm.disk2 #setup nic maping in the custimzation specification Get-OSCustomizationSpec $Custom | Get-OSCustomizationNicMapping | Set-OSCustomizationNicMapping -IpMode UseStaticIp -IpAddress $ipaddress -SubnetMask $mask -DefaultGateway $gateway -Dns $dns1,$dns2 #Build the VM New-VM -Name $VMName -Template $Template -ResourcePool (Get-Cluster $Cluster | Get-ResourcePool) -location $location -StorageFormat $Diskformat -Datastore $Datastore -OSCustomizationSpec $Custom Start-Sleep -Seconds 10 #Set the vCPU, memory, and network $NewVM = Get-VM -Name $VMName $NewVM | Set-VM -MemoryGB $Memory -NumCpu $vCPU -Confirm:$false $NewVM | Get-NetworkAdapter | Set-NetworkAdapter -NetworkName $Network -Confirm:$false #Add Disk 2 if it exists if ($disk2 -ne $null) { $NewVM | New-HardDisk -CapacityGB $disk2 -StorageFormat $Diskformat } else { } #Set vm build date $notes = "Built By: " + $name + "`r`nBuild Date: " + (get-date) set-vm -vm $newvm -description $notes -Confirm:$false #Start the VM to continue the customization process $NewVM | Start-VM } |
VMware tools and PowerCLI part 1
Recently I noticed a few servers did not have VMware tools installed. Needing to see how big of a problem this was, I turned to a few old standbys: RVtools and PowerCLI.
Of course, RVtools was able to provide the info relatively quickly, it was cluttered with extraneous information. I could have chosen to pair down the data by sorting and removing lines, but that seemed like work.
PowerCLI to the rescue!
Having not done this particular task in PowerCLI, the first thing to do was determine how to get the info. A couple of searches later and the VMware tools status was found in the extension data of get-vm: ExtensionData.Guest.ToolsVersionStatus
Great, now to use that data:
|
1 |
get-vm | where {$_.ExtensionData.Guest.ToolsVersionStatus -eq 'guestToolsNotInstalled' } | select name, guestid | ft -AutoSize |
So, a relatively simple one liner to find the VMs with no tools installed. Not being one to stop there and putting google to use once again, I found an article that suggested using New_VIProperty to make it easier to understand and use in the future.
Here is the same thing except we are using New-VIProperty to add some clarity and ease to the process:
|
1 2 3 |
New-VIProperty -Name ToolsVersionStatus -ObjectType VirtualMachine -ValueFromExtensionProperty 'Guest.ToolsVersionStatus' -Force get-vm | where ToolsVersionStatus -eq guestToolsNotInstalled | select name, guestid | ft -AutoSize |
The New-VIProperty cmdlet is very useful! While certainly not needed in the above examples, it gives us building blocks for more complex scripts. Stay tuned for more on VMware tools and PowerCLI.
Featured Posts
Had another weird App Volumes 2.15 error recently. I have a few Windows 10 LTSC 2019 capture machines (1809) and was getting error 2755 unable to detect the file whenever the installer would try to start a .msi file.
I tried rebuilding, I tried disabling UAC, Windows Firewall, anything I could think of. After a bit of internet searching I found several articles saying to remove KB4487017 (February updates). Unfortunately, there was no relevant KB to delete.
After a few more frustrating attempts, I came across a post recommending the following registry change:
on the key HKEY_LOCAL_MACHINE\SYSTEM\CurrentControlSet\services\svdriver\Parameters add the following to the HookInjectionWhitelist
*msiexec.exe ||*
This solved it for my environment, hopefully it will help you as well!

My vMetrics
 34 GHz Total CPU
  96 GB Total RAM
  4,135 GB Total Disk
 1 Host(s)
 2 RPs
2 RPs 25 VMs
 128 vMotions
 (18)
(18)  (7)
(7)  (0)
(0)
 5 Physical NICs
 18 Virtual PGs
 Lab
Lab DRS:
HA:
Target Deviation: 0
DRS Balance:
Dell Inc. PowerEdge R720 previous refresh
1752 days, 21 hrs and 5 min.
© 2024 IndyCloudCover.com. All Rights Reserved.
Powered by WordPress.
Designed by ![]()
Recent Comments